What an STL File Is in Aligner Planning
If you submit cases to a clear aligner lab, your STL files are the single most important thing you hand over. Every tooth movement, attachment placement, and aligner stage is built directly on the geometry inside those files. Meeting the right STL file requirements for clear aligner treatment planning is what separates a setup that comes back accurate on the first pass from one that bounces back with questions and adds days to your turnaround.
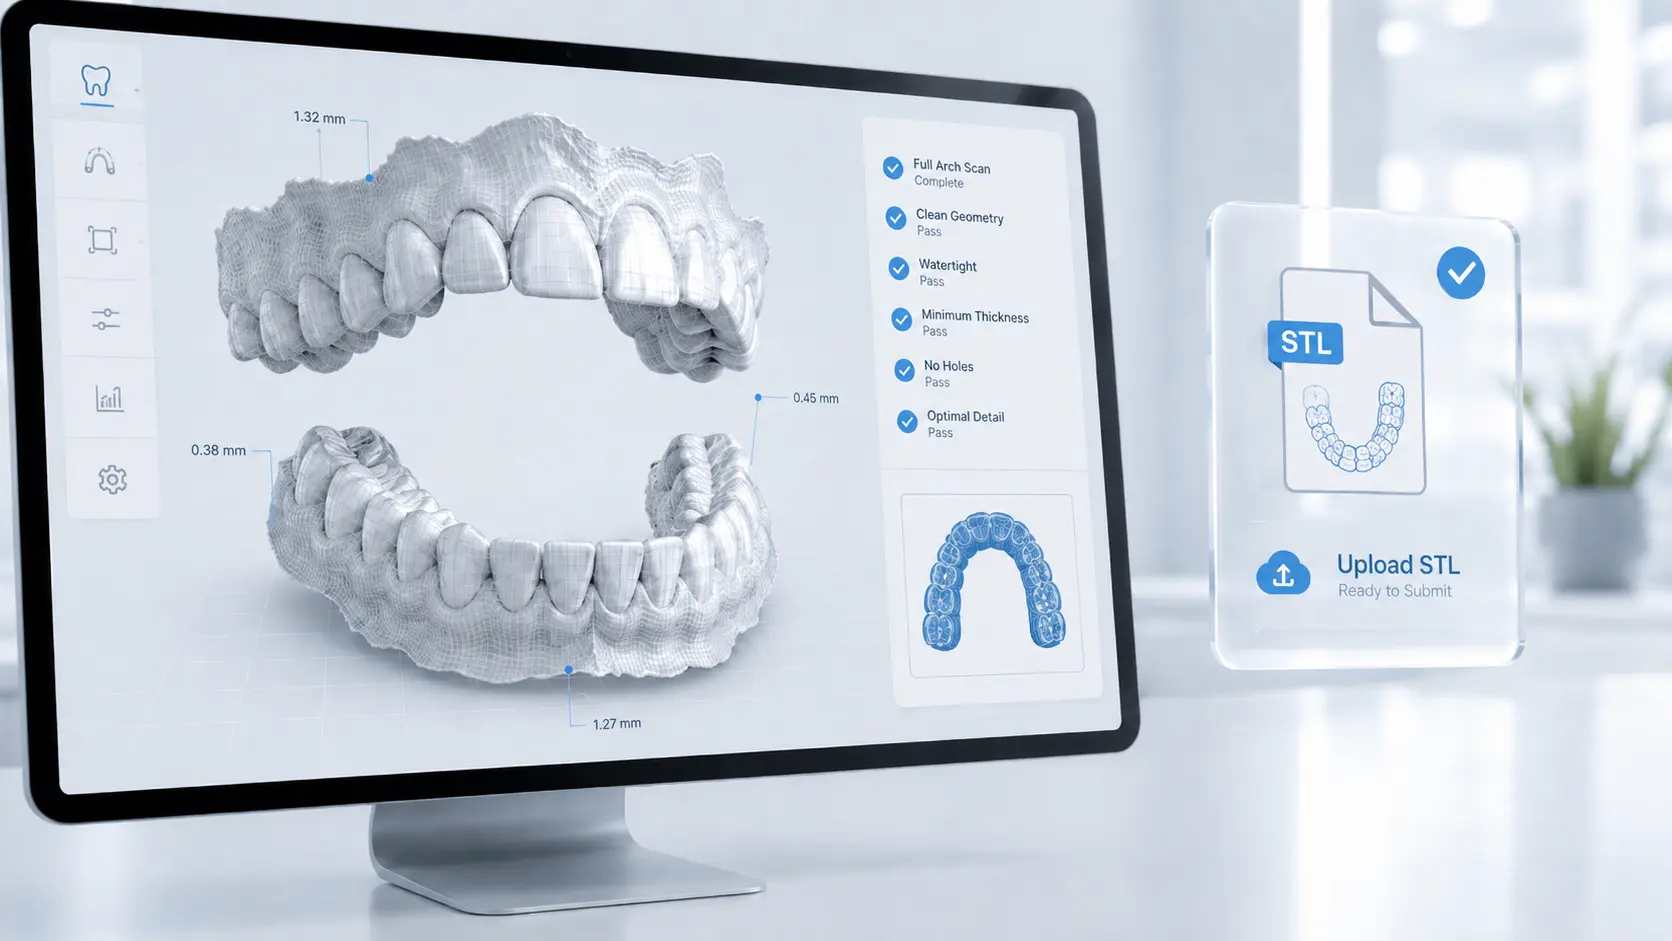
An STL (stereolithography) file is a digital description of a 3D surface stored as a mesh of tiny connected triangles. When an intraoral scanner captures a patient's arch, it stitches thousands of frames into one continuous surface and exports it as that triangulated mesh. The denser and cleaner the mesh, the more faithfully it reproduces the real anatomy — cusps, embrasures, gingival margins, and contact points.
STL is the lingua franca of digital dentistry. It carries no color, no patient data, and no proprietary metadata — just pure geometry. That simplicity is exactly why it has become the default exchange format between practices, labs, and aligner manufacturers. When your setup technician opens your file, they are working with the same surface your scanner saw chairside.
Why STL Quality Decides the Outcome
Clear aligner planning is unforgiving of bad inputs. The software has to identify each tooth, segment it from the gingiva, and rotate or translate it through space across many stages. If the mesh has holes, distortion, or missing anatomy, the technician either has to reconstruct the missing data — introducing guesswork — or send the case back to you.
The downstream cost is real. A low-resolution or incomplete scan can produce aligners that don't seat fully, attachments that miss their intended surface, or interproximal contacts that read incorrectly. Because the entire staged sequence is derived from one source file, a small error at the input stage propagates through every aligner in the series. Getting the STL right the first time protects both your turnaround and your clinical result.
This is also why the file you submit and the digital plan you review are two sides of the same workflow. Once your STL is processed into a setup, the next checkpoint is yours — and knowing how to read and approve a 3D treatment setup is just as important as sending a clean file to begin with.
STL vs. Proprietary Scan Files
Most intraoral scanners save their native capture in a proprietary format and then let you export an open STL. Understanding the difference prevents one of the most common submission delays: sending a file the lab cannot open.
| File Type | What It Is | Use for Aligner Planning |
|---|---|---|
| Open STL | Unrestricted triangulated mesh, readable by any software | Preferred — universal and import-safe |
| Closed / locked STL | STL tied to one manufacturer's ecosystem, needs export authorization | Not usable until unlocked |
| PLY | Mesh format that can also store color | Accepted by many labs; confirm first |
| OBJ | Mesh format with optional texture data | Accepted by many labs; confirm first |
| Proprietary scan project | The scanner's internal working file | Not directly usable — export to STL |
Core STL File Requirements
Across scanners and workflows, a planning-ready STL meets the same handful of technical standards. These are the non-negotiables every aligner lab looks for.
1. A watertight, manifold mesh
The surface should be continuous and closed, with no holes — particularly along the gingival margins and around the most posterior teeth. A "manifold" mesh means every edge connects exactly two triangles, with no stray, overlapping, or floating geometry. Holes at the margin force the software to interpolate where the tooth ends and tissue begins, which is precisely the boundary that matters for aligner fit.
2. Adequate resolution
The mesh must carry enough triangle density to reproduce occlusal anatomy and contact points faithfully. A full-arch scan exported at proper resolution generally lands between 5 MB and 30 MB per arch. Files that are dramatically smaller are usually decimated previews and lack the fidelity needed for accurate movement planning.
3. Separate arches plus a bite
Standard submission is three files: an upper arch STL, a lower arch STL, and a bite registration that ties them together in correct occlusion. The bite can be a buccal bite scan or two pre-articulated arches. Without it, the technician cannot reproduce how the teeth actually meet.
4. Clean, trimmed anatomy
The scan should be free of soft-tissue drape, saliva pooling, lip and cheek artifacts, and excess palate. Trimming loose tissue and bubbles before export keeps segmentation clean and avoids back-and-forth.
- Format: Open, unrestricted STL (PLY or OBJ only if your lab confirms).
- Mesh: Watertight and manifold — no holes at the margins.
- Resolution: Full-density scan, roughly 5–30 MB per arch.
- Files: Upper arch, lower arch, and a bite registration.
- Cleanliness: No saliva, soft-tissue, or bubble artifacts.
- Completeness: Every tooth captured to the gingival margin.
What Your Scan Must Capture
Even a technically perfect mesh is useless if it is missing anatomy the plan depends on. A complete capture includes the full arch end to end — from the most distal tooth on one side to the most distal on the other, including teeth that won't move, because they anchor the plan and define the arch form. It also needs the complete gingival margin, with 2–3 mm of gingiva scanned past each tooth so the software can cleanly segment every crown.
Accurate interproximal contacts matter just as much. Embrasures and contact areas govern how crowding is resolved and where interproximal reduction is planned, so they must be clearly defined rather than smeared together. The bite scan should show the patient in their habitual, fully seated occlusion — not a guided or shifted position — and any restorations, partially erupted teeth, or edentulous spaces should be captured exactly as they truly are.
For complex presentations — significant crowding, deep bites, or cases involving restorative work — completeness matters even more, because the plan has less room to estimate. This is the same level of detail our team relies on when building a fully custom orthodontic treatment plan from your submission.
Not Sure Your Scans Are Planning-Ready?
Send us a sample case and our orthodontic team will check your STL files and return a setup for review — no commitment required.
[email protected]Scanner Export Settings by Device
Every major intraoral scanner can produce planning-ready STL output. What differs is where the export setting lives and whether the file is open by default. The brand matters far less than your technique and your export choices.
| Scanner | STL Export | What to Watch |
|---|---|---|
| iTero | Open STL export available | Confirm the file is the open export, not a locked variant |
| 3Shape TRIOS | STL / PLY / DCM export | Export separate upper, lower, and bite |
| Medit | STL / PLY / OBJ from the scan app | Export at full resolution, not a compressed preview |
| Primescan / CEREC | STL export via the connect portal | Use the open export option for third-party labs |
| Desktop lab scanner | STL from a stone model or impression | Ensure the physical model is accurate and undistorted |
If you are weighing whether to digitize physical impressions or move fully chairside, the broader question of how scanning fits into modern aligner production is covered across our clear aligner treatment planning articles.
Common Errors That Delay Setups
Almost every rejected or returned case traces back to a short list of avoidable issues. Knowing them in advance lets you catch problems on screen before you ever hit export. The most frequent offenders are a locked or closed STL that imports nowhere, holes in the mesh at the gingival margin or posterior teeth, and a missing bite registration that leaves the arches unrelatable.
Close behind are an incomplete arch where a distal molar is clipped or a tooth is skipped, soft-tissue and saliva artifacts that confuse tooth segmentation, an over-decimated file that has lost the detail needed for precise movement, and scan distortion from skipping across a large edentulous span or rescanning poorly. The good news: a quick on-screen review of your scan — rotating each arch to inspect margins, contacts, and the bite — catches nearly all of these in under a minute, and that single habit prevents the majority of treatment-planning delays.
How to Export & Submit, Step by Step
Use this sequence every time and your files will arrive planning-ready.
- Complete a full-arch scan Capture both arches end to end, including the full gingival margin and every tooth — even those that won't move.
- Capture the bite Take a buccal bite scan on each side so the arches can be articulated in true occlusion.
- Review on screen Rotate each arch to check for holes, distortion, soft-tissue drape, and clean interproximal contacts. Rescan any weak areas before you finish.
- Trim artifacts Remove loose tissue, bubbles, and excess palate so tooth segmentation stays clean.
- Export as open STL Choose the open, full-resolution STL export and save three files: upper, lower, and bite.
- Label clearly and submit Name files with the patient ID and arch, then send them with your prescription and any photos or clinical notes.
How We Use Your STL Files
Once your files arrive, our orthodontic team imports the open STLs, articulates the arches using your bite registration, and segments each tooth. From there we build a staged digital setup — sequencing movements, planning attachments and any interproximal reduction, and defining the final position — then return it to you for review and sign-off before a single aligner is produced.
Because that plan is built entirely on your STL, the quality of your scan directly shapes how little revision the setup needs. Clean files mean fewer rounds of back-and-forth and faster approval. If you produce aligners under your own brand, the same standards feed straight into our OEM clear aligner manufacturing process, where consistent, high-quality STL input keeps every case predictable at scale.
And once your setup comes back, the workflow hands control to you. Reviewing each stage, checking the final position, and approving — or requesting changes to — the plan is the next critical step, and one worth doing carefully on every case.
Frequently Asked Questions
What file format should I send for clear aligner treatment planning?
What is the difference between an open STL and a closed STL?
Do I need a separate bite scan with my STL files?
How large are STL files for aligner cases?
Can I use a desktop scan of a physical model instead of an intraoral scan?
Why was my STL file rejected by the aligner lab?
Does scanner brand matter for STL quality?
Worldwide
Ready to Submit Your First Case?
Partner with Clear Moves Aligners for accurate, fast treatment planning built on your scans. Send your STLs and we'll handle the rest.
[email protected]